|
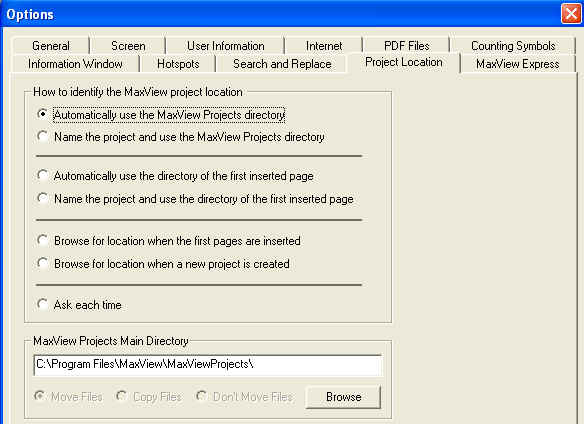
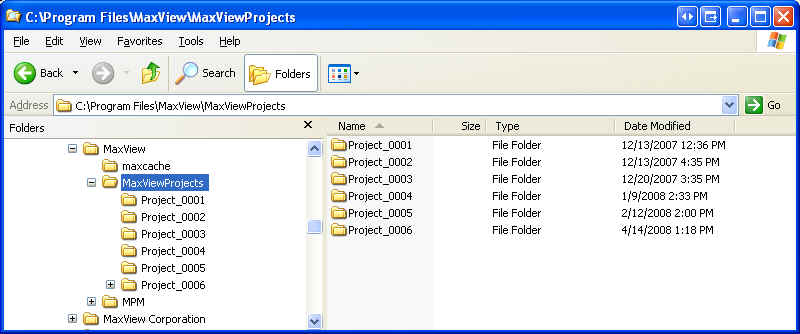
MaxView Project Directory
|
MaxView
Project Location Option
The MaxView projects directory is the default location where MaxView projects will be saved.
|
|
This default
location is created on the C drive at C:\Program Files\MaxView\MaxViewProjects\.
Note:
You can browse and define a new location for this Directory and then with the radio button choice,
you can Move, Copy or Don't Move files of projects that may already be saved in the default location.
The MaxView Projects directory will number each new project
sequentially.
All files inserted into a MaxView project are copied to the specified folder in the MaxView Projects
directory
(see
example in screen shot below).
|
|
MaxView- Converting PDF to TIFF
|
How
to convert PDF files to TIFF files using MaxView (at MaxAuthor, MaxWebAuthor,
and PAYGAuthor's only
-
Open MaxView from the icon on your desktop
-
Select File/New
- Select
the Options menu from the top of the screen and select Project Location
-
Choose the third option down, Automatically use the directory of the first
inserted page
-
Next, select PDF Options from the Options tabs
-
Set the DPI for large sheets to 250, B&W Dithered
- On
the same options page, select Insert PDF to. . .View in MaxView
-
Select OK
-
Right Click on Untitled Document in
the Document Explorer window and select Insert Pages and Folders,
then Insert Pages
-
Select your PDF files
-
Select OK
These
steps will bring your PDF files into MaxView and convert the first page to a
TIFF file for automatic
viewing
in the view window. In order to process converting the rest of the PDF
files to TIFF files you must
click
on each page to view it in MaxView. It is the viewing of the pages in
MaxView that causes the PDF to
be
converted to TIFF.
Your
converted TIFF files will be in the same directory as the source PDFs due to
your original settings for
the
project location files.
If
file names are important to you then the next step will be to go the
file location and change the TIFF file names
to
delete the PDF reference. Example: Original PDF file name is. .
. 30Pg_CombinedPlans.pdf. PDF converted to a TIFF file with MaxView
gives
this file name. . . 30Pg_CombinedPlans.pdf.0001.tif
Important
Note: In order to complete the conversion process you must have your PDF
documents in a
"write-able
location" on disk. For example a MaxView project on CD that
includes PDF files that the
contractor
want to convert to View in MaxView, must be moved to the hard drive before
doing the conversion
as
MaxView is going to create the useable TIFF files in the same directory as the
PDF file.
|
| Coming Soon... |
| MaxCaptureV8 |
| ~Our
newest addition to the MaxCapture family includes support for
Windows Vista as well as multiple user interface improvements!
|
| Tech
Tips... |
 |
|
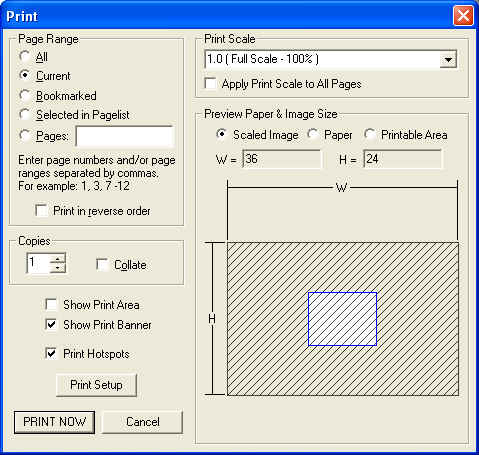
Printing Tips |
|
Turning
Off the Print Hotspot Buttons Feature If
you are working in a MaxView Document that includes Hotspot buttons
(otherwise known as hotlinks to other pages within the document),
you can print these pages by turning off the Print Hotspots
option in the MaxView Print Dialog box. See example of hotspot
buttons in blue on the plan page image below. 
Go
to File and select Print from the menu to see the print window
below. Deselect the Print Hotspots button.
|
|
Free
and Secure MaxReader
|
|
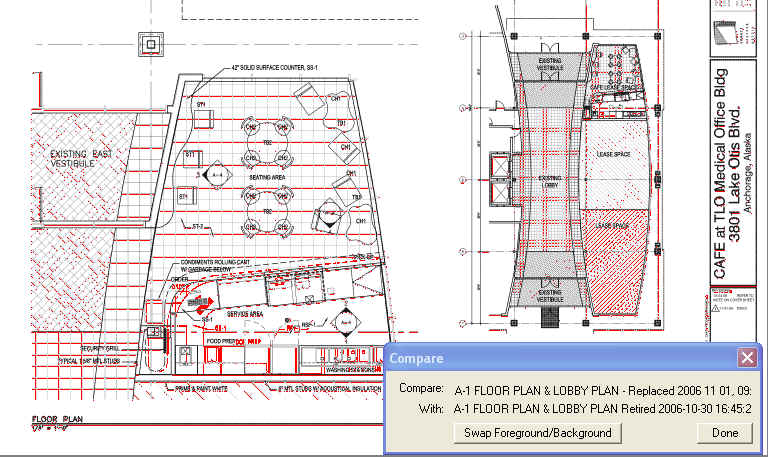
Compare Images
(this
feature is available to the Free MaxReader product level and above
if project is opened with the MaxView Index file, .maxFR)
With the Compare Images functionality, the ability exists to show two images on top of one another in one window to be able to view the differences between the two of them.
To accomplish this:
- In the Document Explorer window, select the first image
- Holding the shift key down, select the second image
- Right click with the mouse and select Compare Images
At this point, on the screen you should see the first image with the second image superimposed over it.
|
|
MaxTakeOff
|
|
Calibrating
If a drawing contains an accurate scale key, you can set the scale with the Scale bar so that when you measure a distance on the drawing, the values shown in the Information window will correlate with the values shown on the drawing. If, however, the values shown in the Information window do not correlate with what the drawing indicates, then you must set the measurement scale or calibrate.
Calibrating assures that MaxView "understands" the correct scale of a drawing or an entity on that drawing so that measurements are recorded in the proper units. For example, a drawing may indicate that a fence post is 10 feet high, yet when you measure it the Information window indicates 37.587 inches. To bring the MaxView measurements into line with the intent of the draftsperson in such an instance, you would set the measurement scale by calibrating. You can use any of the following to calibrate:
Calibration dialog box
Measurement Scale and Units options
Scale bar (except in MaxReader and Secure MaxReader)
After you set the measurement scale, you save the calibration and all subsequent measurements reflect the new scale. When the calibration is saved, it applies to the page on which it is saved for the current session of MaxView. When the document is saved (all products except MaxReader and Secure MaxReader can save a MaxView document), the calibration is also saved and can be used in another session of MaxView
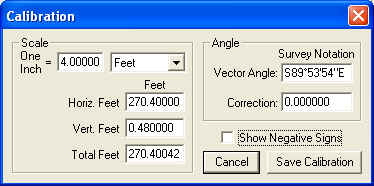
To calibrate an image and set its scale:
- Measure a segment on a drawing that has a length indicated on the drawing. Confirm that the measurement is
displayed in the Information window.
- Right-click and on the Zip menu select Calibrate.
- On the Calibration dialog box, select a unit of measurement in the pull-down box before you change any other values.
- Enter the value for total length that's shown on the drawing. Note that other values in the dialog box change.
- Click Save Calibration.
All subsequent measurements taken should correlate with measurements indicated on the drawing, and you can take measurements for a takeoff. If there is not agreement, this means that there is more than one scale setting for that page; in that case, re-calibrate each time there is a discrepancy.
|
|
MaxMarkup
|
|
Markup Summary Report
With the Markup Summary Report, a user can create a report that shows all additions to the document, whether they be annotations, attachments, text or notes. Included in this report is the name of the user who created the addition and on what layer and page in the document where the addition is
located.
To create the Markup Summary Report, you can either select the Markup Summary Report tool on the toolbar, which looks like this:
 , or you can go to the file menu and select Reports, then select Markup Summary Report. , or you can go to the file menu and select Reports, then select Markup Summary Report.
Once selected, you will be presented with this dialog:
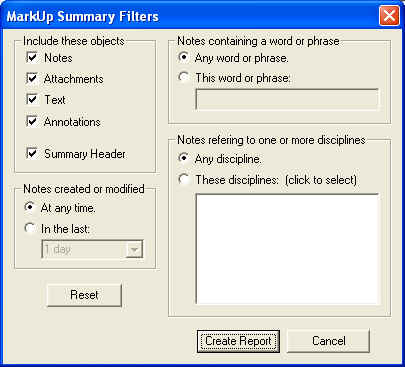
On this dialog, you can chose what you want to see in your Markup Summary Report. Changes made here will be reflected both here in the generated report and will be kept for you the next time you invoke this dialog.
Under Include These Objects, you can select:
- Notes, which will show you any and all notes on all pages of your document, including who created them and when they were created.
- Attachments which will display a list of attachments and their locations in the document. Note that this doesn't display the actual attachment, just notes that there is an attachment and the filename for said attachment.
-Text which will show any text annotations in the document, including who placed the text in the document, what the text says and where it is located in the document.
-Annotations will show any annotations in the document, such as arrows, straight line highlighter lines, squiggly line highlighters, etc, that wouldn't be covered under the Notes, Attachments and Text options above.
Under Note containing a word or phrase:
-Select Any Word or Phrase will show EVERY note in the document, regardless of what the note contains.
-Select This Word or Phrase and the report will show ONLY notes that contain that word or phrase denoted.
Under Notes Create or Modified:
-Selecting At Any Time will show all notes, regardless of creation or modification date/time
-Selecting In the last will allow the user to select a range of time, ranging from last 30 minutes to last 3 months and only notes created within that designated timeframe will show up in the Markup Summary Report.
Clicking the Reset button will reset the values in the dialog box to their default (stock) behavior.
|
| MaxAuthor
|
|
Creating a Pointer File
to Publish Your Project Files to the Internet
How To Create a Pointer File:
1) Start Notepad.
2) In the first line type: MAXPT
3) Follow MAXPT with a space and then enter the complete URL that points to the actual .maxFR file of your project. For example:
MAXPT http://www.company.com/webfolder/projectxx.maxfr
Or
MAXPT
http://ebs.sas.usace.army.mil/Solicitations/DACA21-03-R-0073/Plans/INDEX.MAXFR
4) Save the file and close Notepad
5) Rename the file extension from *.TXT to *.maxFR
NOTE: You will get a notice that changing an extension may make the file unusable. Ignore this message.
6) Move this file into the top-level folder of your project.
7) Have the website (HTML) link point to this .maxFR pointer file. When a user accesses your website and clicks on the web URL, the pointer file will now re-direct MaxView to the actual location of the .maxFR file for the project.
Why do we use "Pointer Files"?
The reason MaxView uses pointer files is to provide selective on-line Internet access to the large format drawing files and other documents that were organized by the Author into a MaxView file. Pointer files are direction files that enable MaxView to directly access all related data files on the web using its built-in HTTP protocol. Web browsers, such as IE and Netscape, assume that only web browsers have the ability to access the data it needs using the HTTP protocol. Because of this assumption, when we try to access a maxFR file via an HTML hyperlink, the web browser downloads the maxFR file to its local temporary cache. Then it activates MaxView directing it to open the local copy of the maxFR file in its cache... something like this:
MaxView C:\Windows\TemporaryInternetFiles\...\constructionplans.maxfr
With this address MaxView, the application, has no idea where the file originated. This maxFR file was probably created so the image files would be found in the same directory as the maxFR file. But the browser only downloaded the maxFR file to its cache, not the image files, and left MaxView with no idea where to find the image files. As a remedy for this problem, we created the pointer file. When MaxView opens the pointer file it immediately recognizes that it does not contain the document index and the other data found in a "regular" maxFR file, but only the correct address where the real maxFR index file can be found. MaxView can then retrieve the maxFR index file and use the URL to retrieve the image files.
|
| MaxWebAuthor
|
|
Insert Folders From
List (feature also available to PAYG WebAuthor)
MaxWebAuthor 4.0 has the ability to insert folders from a list. This feature allows a user to set up a default group of folders, which will always be available to them for every MaxView project they create.
To Insert Folders From List:
-In the Document Explorer, right click then
-Select Insert Pages and Folders
-Select Insert Pages From List (This brings up a dialog that looks something like this)
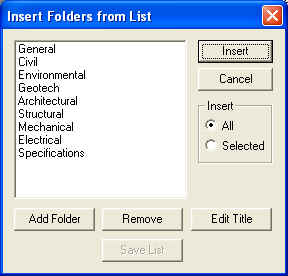
Note: This example shows several folder names that have already been defined.
The user can insert all the folder names in the list or just the selected names. Folders are inserted in the Document Explorer at the top of the list of pages. Use drag and drop or the User Sort function to move the folders to the desired position in the page list.
You may Add, Remove, or Edit folder names by clicking the appropriate button If the list of folders is changed, the user must select Save List in order for the changes to be reflected in subsequent uses of this function.
|
|
MaxCapture
|
|
ONETIME
AutoCAD Page Setup for MaxCapture
|
|
MaxCapture
Print Driver
&
Creating
Page Setup Files Using AutoCAD Architectural Desktop 2006 (ADT)
To create a page setup(s) for use in the office
"template" drawing folder on your internal server, and be able to
"import" page setups into various drawings that may not have been
started using the "office" template. For full instructions Click
Here. . . For other questions regarding MaxCapture, contact
MaxView Tech Support at (888) 320-3032.
|
|
|
| Technical
Support is available to you by: |
|
ü Online Tech Notes & FAQ's |
ü
Emailing  techsupport@maxview.com
|
|
ü
Calling (425) 438-3168 or (888) 320-3032 |
|
|
|